I think I've read dozens of books and blogs and websites extolling the virtues of freezer paper stencil printing and now I understand why. I have made permanent stencils out of the harder plastic stencil sheets and was always disappointed. First, it hurt my delicate crafting hands (I'm a wimp) to push so hard on the exacto knife, and second, the permanence of the plastic stencil seemed fraught with anxiety for me. The freezer paper was almost freeing in it's quickness and impermanence. And yet, if you make a paper stencil you like, you could easiy transfer your design to a more permanent plastic stencil.
I also like the way the speed of the freezer paper stencil gives you the ability to make all your friends a customized, more personal version of something that could seem borderline mass produced, like the apron below. Everyone gets something one-of-a-kind and you still have time to read to the kids and contemplate world peace.
Tuesday, December 16, 2008
Quick and Dirty Christmas Giving
Here's a really quick project for Christmas giving. It's not actually dirty unless you attempt it with small children and then, watch out. We started making our own hot chocolate mixes this summer for going camping and I am a total convert. I've always thought packaged mixes tasted slightly of microwave popcorn (gag) and making your own couldn't be much simpler. The only crucial piece of equipment is a metal mesh sieve to run everything through. It really makes the difference and makes the cocoa and powdered milk homogeneous and easy to mix with hot water. Without the sieve the mixture tended to be lumpy and hard to mix. Really, who needs all the extra stirring, I'm already so tired at the end of the day. So, just mess around with good quality cocoa, powdered milk skim or whole, sugar and then for the fancy giving add powdered ginger or pulse the mix with a few drops of peppermint oil.
Killer Bunnies
In honour of Postmodern Hausfrau's birthday the girls and I mailed off some Killer Bunnies. The original recipe was for Christmas Mice cookies, very cute with little liquorice tails but somehow not quite right for dearest PH. It was the most fun I've had with the girls in the kitchen for a while. There was minimal mess, no rolling pin wars and each girl got to roughly handle their own ball of dough without infringing on each others territory or my sanity. I put out a bunch of slivered almonds in a bowl for them to stick in their dough balls and make cookie 'monsters'. This distracted them totally and gave me enough time to make these funny little bunnies. Unbaked they sit up quite perkily and when in the oven they slump a bit so it became unclear if they had front feet or giant bunny fangs a la Bununcula (one of my personal childhood favourites which I can't even find a link to send you to for a trip down memory lane).
The recipe for these bunnies or any creature you dream up is as follows:
3 c all purpose flour
1/4 tsp salt
1 c butter, softened
3/4 c sugar
1 tsp almond or vanilla extract
1 large egg
Slivered almonds
Candies of your choice
Melted chocolate to glue candies to cooled cookies
In a large bowl, cream butter 2 mins. Add sugar and cream a further 3 mins until pale and fluffy. Add extract and egg, beat to combine.
In another bowl whisk together flour and salt.
Add flour to butter mixture 1/3rd at a time.
Wrap dough in plastic wrap and refrigerate 2 hours or overnight.
This recipe is meant to make 40 cookies so make fairly small balls. Shape them as desired and stick all over with almond extremities.
I tried sticking the candies into the dough but they didn't stick well. I found it easier to stick their eyes on with melted chocolate after they were baked.
Bake at 350 F for 10-15 mins depending on the size. They should just be turning golden brown on the bottoms.
Cool on racks. Decorate. Enjoy.
Thursday, December 11, 2008
Gingerbread houses
It was our first year making gingerbread houses with the girls and if I had known how much candy and icing they would actually eat, and how incredibly crazy all that candy would make them later I might have put this activity off until they were 10. Or just skipped it and told them to try it when they have kids of their own. It was pretty fun though and brought back a lot of memories of doing this in my mom's mom's kitchen. Grandma 'R' and her three girls and the grand kids all in the tiny kitchen assembling our gingerbread version of Santa's workshop, house, sleigh, reindeer, presents, stained-glass windows and all. Downstairs in his workshop my grandpa was busy constructing the box all the gingerbread would sit on with holes placed under each house for lights to poke through and illuminate the houses from within. It was elaborate and delicious and one of my best childhood memories. So, I suppose we'll go ahead and do this again next year.
The final work of art!
Wednesday, December 10, 2008
WinterWonderland
Here's Arlo riding a pony named Muffin. Boss Hog insists that even though Christmas crafting is in overdrive trying to complete 10,000,000 projects in time for the big day, I should participate in family activities. I am simultaneously full of holiday cheer and a total drag. I am cheerful only when the sewing machine is whirring towards the big festive deadline.
Anyway, since there are so many great things to do and see here at Christmas we headed out for some family fun at Predator Ridge. It's a fancy local golf course that had it's first WinterWonderland event and it was a lot of fun. The kids can't stop talking about riding the ponies. Apparently three minutes on a tiny horse trumps any craft project I have ever devised for them. Go figure. Next up we are looking forward to Caravan Farm Theatre's winter sleigh ride performance. I think the girls will go bonkers when they see the size of their horses.
Tuesday, December 2, 2008
The Purple Quilt
The idea for this quilt was that Eden and I would potato and apple stamp some purple fabric together in a whirlwind of mother-daughter love and mutual admiration. I would then, according to her wishes, fashion her a new blanket from the stamped fabric (her feet stick out the bottom of her baby blanket that she loves). It would bring us closer and empower her artistic sensibilities in one fell swoop.
Ahem, and then it turned out that she is still only three and had no inclination to stamp three separate yardages for me to quilt. Could not be bothered beyond the first three stamps let alone three whole yards. And you know what, it's lucky for her she bailed when she did because her mother is a total control freak!
I finally pieced this thing together after I discarded the first two yards of fabric that I printed top to bottom and hated so completely they will never see the blogosphere. There was a re-evaluation of my relationship with purple (quite rocky but still civil) and a re-purchasing and re-printing of more fabric. I would likely obsess over this quilt some more but since Christmas is coming rather quickly I bound the edges and started hand sewing in the big magenta squares. Finished photos to follow more than likely after the Christmas hoopla subsides.
Monday, December 1, 2008
Peppernuts
For the past few years I have been getting together with about a dozen friends in early December for a cookie exchange. If you haven't done one before it works something like this:
step 1. organize your group and finalise the number who will be participating.
step 2. pick your top 2-3 recipes and call everyone to make sure all of you are
not making the same chocolate chip recipe off the bag of chips.
step 3. bake like mad until you have 1 doz. cookies for each person in the group
including yourself.
step 4. get everyone together for a cup of hot chocolate, glass of wine etc. and
at the end of the night you go home with x dozen different cookies all
ready to be plated at a moments notice when holiday guests stop by
unexpectedly.
step 5. glow and blush when everyone notices how organized you have been and
gobbles down the beautiful selection of treats you have set out.
This year I (with much help from Eden and Arlo) am making the most delicious Peppernuts. The recipe I will not give out as it is a family one from Postmodern Hausfrau and I don't want to infringe or start a family feud. But, it must be said, is the greatest slice and bake cookie ever. In part of course this is due to the absolutely tiny size of the cookies, totally irresistible, but the spices make it. I have had my nose stuck in Baking in America by Greg Patent for a while and I suddenly realized how limited my repertoire has become. Everything doesn't have to be chocolate? Heresy! But it's true and these cookies are proof.
**Notice the pan I forgot in the oven when we went out to see our small town's Christmas Light-Up. I am sooooo lucky I did not burn down our house in pursuit of Christmas cheer.
Tuesday, November 25, 2008
Blue Steel
Check out Eden sending out her best 'blue steel' in her new (so new she isn't even getting it until Christmas) purple housecoat. My husband, who incidentally wishes to be forever here refered to as 'boss hog'? (um, we may need marital counselling but that's another post) is gripped with the desire to present her with a licqorice pipe in her stocking an start calling her 'heff'. I adapted a pattern I had for a quilted coat/jacket by staring at both the pattern and my own housecoat until they had fused into this and I think it might be one of my most satisfying sewing projects ever. I made one for Eden and a smaller one for Arlo and they both fit perfectly and had to be worn all day and then hidden away for Christmas under cover of darkness. It's a rare occasion when I sing the praises of toddlers short attention spans but it does come in handy from time to time.
More Wall Hangings
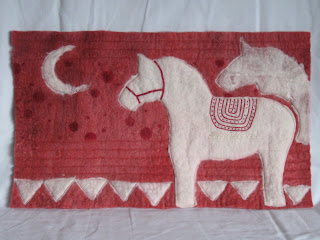
Here are the last felted wool wall hangings for the show in two weeks. The first picture is remarkably bad (notice the wrinkled sheet? could you even see past it? it almost makes my eyes bleed, but I digress...). The horses were based on the Swedish Dala horse, and a book I got out of the library called Per and the Dala Horse by Rebecca Hickox and illustrated by Yvonne Gilbert. I took it out of the library for the munchkins, Eden and Arlo, so the book is intended for the five and under set but it did inspire me to research and make work based on the original carved pine horses from Sweden. In fact, I don't think I'm done with the Dala horse yet.
Monday, November 10, 2008
thank you kirin notebook
I was out in the blogosphere the other day and found this post from kirin notebook which was totally validating for me. I have spent the last few years at home with my kids and somehow feel suddenly that I have no idea what I'm doing. Despite art school and life experience I fall easily into the trap of sweatpants wearing, low-self worth harbouring housewife and totally forget that I am as capable as I ever was of producing valid work and feeling, if not pride, then at least satisfaction in my work both as a mother and an artist. Postmodern hausfrau and I have discussed this probably once a week on the phone for the last three or four years and now (probably because our kids are finally sleeping more and we have regained our powers of concentration) I am ready to be somewhat more accountable for my own output into the world. This does for my part include a bit of hippy-ish planet saving homemade soap and homemade granola --try not to hold that too much against me and I will do my best to stay off my soapbox--but also means that I have to take myself as seriously as a creative person as I would advocate any of my friends to. So I resolve to be nicer to myself, to save the sweatpants for housework, and take kirin notebook's suggestions because they are good ones.
1) Start somewhere, anywhere. Create and output as much as possible. Creativity is a skill that requires practice and more practice. That guy you know who's a fantastic drawer - he's been drawing and doodling since the age of three. Same with that girl who's a fantastic pianist. Practice.
2) Start a blog. This is fantastic for feedback and support, and also helps to motivate you to make/draw/design stuff to appear on it.
3) Do a short course to build up basic technical skills. Eg for my medium: Illustrator is always handy, or Photoshop. So long as you have the basics you can build your skills on the go. And/or google something if you don't know how to do it :)
4) Do lots of research. Keep a folder of inspiring things. Try imitating the things you like - it's not copying because you'll change it with your own unique style (however if it does end up too similar make sure you credit the original and don't try to make money off it!)
5) Talk to other creative folk. Don't interpret 'thinky' or shy as standoffish. Some creative folk can seem hard to approach because they seem all 'too cool for school'. More likely they're just off wandering in their minds somewhere and are actually really nice people. Although there are some not-so-nice peeps out there, they're probably insecure and wont want to share anything with you anyway.
6) Drink lots of water! (well, not too much). It's good for the brain. I freak out if I leave the house without my water bottle as much as when I forget my lip balm ;)
7) Don't eat crap. Eat a balanced diet that includes protein and good fats - these are just as important as eating your veggies! There's nothing worse than sugar highs and lows to ruin your productivity and put you in a grumpy mood.
8) Take small, measured risks to get where you want to go. If you can find a way to make small batch units of something, that's always good. Then you can build up from there.
9) Surround yourself with supportive people. Don't go showing your early artwork to that person you're desperate to impress but you know doesn't appreciate creative things. It'll only discourage you and grow those seeds of doubt like "oh but I'm just NOT a creative person!". You are!
10) Don't undersell yourself (or your peers!) when it comes to pricing! A good rule is to always make sure your product is wholesaleable. You must be able to divide your retail price in half and still make a profit! Here's a good simple formula:
(Labour + Materials) + 100% markup = Wholesale Price*
Wholesale Price + 100% markup = Retail Price.**
* - because you still need to make some profit even if you outsource your 'making'.
** - because retailers almost always want to mark things up by 100%
It's therefore good to retail for a similar price to your (potential) wholesale customers, so you're not undercutting them.
Tuesday, November 4, 2008
The wall hangings
It's been awhile, I know. I am a bad blogger already and it's only the second post. The struggle so far seems to be with time management. I have to choose if I would rather make something new or post about the things I have already made. I know the struggle is common but it doesn't make the answers any easier. I did make some hammered silver jewellery and will eventually post about it if I ever take my newest earrings out of my own ears and photograph them.
But, to stay on the woollen track I set out on, here are some felted wool wall hangings that I made recently. Some are for a gallery show and a few are destined for friends and family but all were very useful for learning. Much more useful for learning than the not so giant rug in fact. The colours were all gotten by kool-aid dyeing. Some of the pieces have hand and/or machine embroidery and a few have been stencilled on top of as well.
There were technical questions that came up for me while I was working though that I haven't found answers for. And I don't even really know who to ask. I have a few great felting books and there are scores of 'project' type books available at the library but I love information and the greatest source of felting knowledge have found so far is Felt: New Directions for an Ancient Craft by Gunilla Paetau Sjoberg. It is the closest thing to a felting text book I have seen. I know it makes me an absolute obsessive, but I would rather have a book full of information than glossy pictures of the authors work with scanty instructions or insight. I embrace my inner info snob and get on with felting.
Friday, July 25, 2008
Alright, enough procrastinating to avoid first post anxiety... here it is the first big felting project that I used up most of my first 5lbs of fibre on. It's a rug I'm working on for my oldest daughter's new 'big girl' room.
I learned a lot from this project. First, that felting on this scale is hard on the wrists and i might need a personal trainer to prepare me for the next rug. Second, that if you like your kitchen table, FELT SOMEWHERE ELSE! I've rubbed the finish off the table in a few spots. Next, that my kitchen table, and indeed my kitchen, are only large enough to produce a rug roughly 2.5 x 4.5 feet. (And this was two kitchen table sized sections joined end to end) This is not really as much rug as I would have liked for the output of elbow grease that was required. However, I just got 10lbs more lovely merino wool to mess with so there is more felting on the horizon to be sure. I think though that I will try to learn more on smaller projects and save up my wrists for when I make a truly great rug sometime in the future.
The polka dots were all kool-aid dye experiments that needed to be used up on a base of un-dyed merino wool. Even looking at this now I wonder at putting a white rug in a three year old girls bedroom. Luckily, since it's my first rug, by the time it is finished I will probably hate it. I don't tend to be too precious about finished works. A few hours after it's finished I'm already plotting the next project. Which is much smaller in scale and much easier on the wrists. Hammered silver wire jewelry.
I'm nothing if not diverse.
Subscribe to:
Posts (Atom)